
What a year it has been!
Retirement has been … an adjustment to say the least.

I went from looking like this (not quite as dressed up)

To looking like this on a regular basis!
So, what have I been doing with myself?
Other than not cutting my hair for a couple months and not shaving for even longer, I’ve been grinding away at my side hustle. If you’ve followed me at all, you know my shop space is seasonal. Which is a polite way of saying, my shop is outdoors, unheated, and has zero frills. However, what it does have is a guy who loves making, creating and building whatever sounds interesting. A couple cases in point to let you see what I’ve been up to in the past 10 to 12 months.

I’ve wanted to make a stand for my drill press for some time, so I finally did it! The drawer fronts are from a few pallets I took apart a couple years ago and the drawer pulls are barrel rings from a wine barrel. It’s unique and functional, plus it looks cool!

I wanted a more professional and functional cabinet for my desktop engraver, so I designed it and built it! The top 2 drawers are a separate cabinet that can be lifted off the bottom cabinet. All the components and accessories are inside the top, making it ultimately independent from the bottom which holds engravable materials!

I made a quilt rack! Some friends wanted a shelf for a quilt that would hang over another piece of furniture. The shelf is the same width as the cabinet it sits above, there is an integrated French cleat in the back and a 2 inch thick “rod” to hold the quilt in place. Again, this was designed 100% on my own.

Last but not least, a commissioned coffee table, designed on my own with input from the owners. We laid out tape on the floor to figure out the perfect dimensions for this ash table. The color of the bottom was perfectly matched (thank you Sherwin Williams) to their existing furniture.
So, what do you need made that you cannot find in a store? Let’s work it out together!
Upcoming Events!
I’m less than 12 months from retirement, time to figure out if I can do this for a living!

This spring looks to be quite busy, thankfully I’ve secured two new sources for whiskey and wine barrels. Until this happened I wasn’t able to get full wine barrels at all, and shipping of the staves alone was cost prohibitive. As of this Email I have 6 wine barrels and 3 whiskey barrels sitting ready to be taken apart and made into something with more on the way.

Barrel head guest books with the new laser
February 25th at the Double Tree in Manchester I’m setting up a booth at a bridal expo. The current plan is to have a whiskey barrel rocker raffled off, as well as have visitors sign the above guest book. Who are Tony and Alicia? No idea, but the date is the date I registered Kilted Moose Outdoor Furniture as a trade name with the state of NH. On top of these things, I’m going to have the smaller engraver on site to do custom items right then and there.

Homeland Heroes Great Gatsby Gala!
In August I sponsored a ride for a foundation in the name of a deceased NH Service Member and met Julie who runs Homeland Heroes. After a brief conversation, she and I struck a deal, which will include raffling off two whiskey barrel rockers and a barrel head side table. The event looks to be a lot of fun, we are definitely attending, if you want to join us please reach out to me as soon as you can. joe@kiltedmoose.com

This will be BIG!
And the final bit of expo related news, I’ve sent in my application to set up at the Made In NH Expo! Last year I laid out the groundwork to attend this event, the expo is 3 days and attracts thousands of visitors every year. This means I need lots of inventory and need to stand out from other vendors there. The event planners limit the number of overlapping booths so they aren’t flooded with too many of the same items. They’ve received my application, I’m hoping to hear from them soon with positive news. I will have chairs, rockers and engraved items for sale all weekend if I’m accepted!

I’m a registered LLC!
Closing this out with the biggest news of last year. I registered my business with the state as a LLC! Considering the time and effort I put into Kilted Moose this year, it just made the most sense.
Someone Got A Laser
It took roughly three times longer to get the CNC machine and laser I ordered in June than expected. It didn’t help that UPS managed to lose 2/3 of the boxes required to make it! Don’t worry, they dropped them off on my door step a month later with no explanation or comment. Oh well, obviously I’ve moved on. The entire point of finally taking the plunge into getting a CNC was to create a one of a kind wedding guest book for my youngest. Okay, that may not have been it, but it was a great excuse to spend that kind of money.

While I impatiently waited for the CNC to arrive, I found a hell of a deal on a desktop laser. What can I do with a desktop laser? Offer customization and personalization on just about everything I make and a few things I don’t!

Building a Whiskey Barrel Rocker.

So you want to build one for yourself, free plans are right here!
To start, I removed the excess charcoal from the insides of all the staves. This can be done with a sander and some 60 grit or a wire wheel. After that, I gave the outside of each piece a once over with 120 grit sandpaper. I didn’t want to go too aggressive sanding as I didn’t want to take away from the look of the pieces. White oak is very dense, but splinters happen and they can be pretty brutal. Pieces I knew would be in contact with skin, or had the chance to be rubbed against, were gone over twice, particularly the edges of the front or outer parts of the staves. After, the fronts and backs were given two coats of spar urethane as an extra layer of protection for both the chair and the person using it. Once it was finally assembled, any cut ends were also sanded, rounded and coated with spar urethane again to seal them.
The first thing you need to keep in mind is, not all barrel staves are the same. In reality, none of them are ever the same. They’re different widths, have different bends and different shapes. It will take approximately 30 of these to get a rocking chair done, which is roughly the number of staves in a barrel itself. It’s best to start with the ones that give the most shape or function to the chair itself, my starting point is the rocker runners. You’ll need to find a pair that have roughly the same amount of curve to them so it rocks evenly, or at evenly as possible. This is not going to rock like a normal rocking chair, the barrels serve a function, and at no time did the Cooper who made the barrel think, “these need to be curved right so the person who takes it apart to make a chair is happy.” As you can see from the below, I’ve laid a number of staves out to show the different curve to them, the runner will have to be wide to support the chair, but I have doubled up runners previously with success.

Different widths, curves and shapes throughout.
The next pieces that need a complimentary arch are the seat and back legs which hold the seat up. While you’re probably going to drive yourself crazy trying to find 8 or so staves that have the exact same curve so your seat is smooth. Please don’t bother. You can have considerable movement in here and not feel it. Even though the below looks like they all have similar curves, once mounted onto the back legs you can see the difference. The back legs should also have a roughly similar curve to them, much like the runner, they give a majority of the shape to the chair and the seat.

The seat slats are cut at 28 inches and the seat depth is 17 inches from front to back. The seat will need to be cut on both ends to keep the shape consistent. Here’s where things get tricky. Whiskey staves are typically 35 inches in length, are wider in the middle than the ends, and are set to curve. One trick I use is to place a piece of the barrel against the chop saw fence to allow for part of the curve.
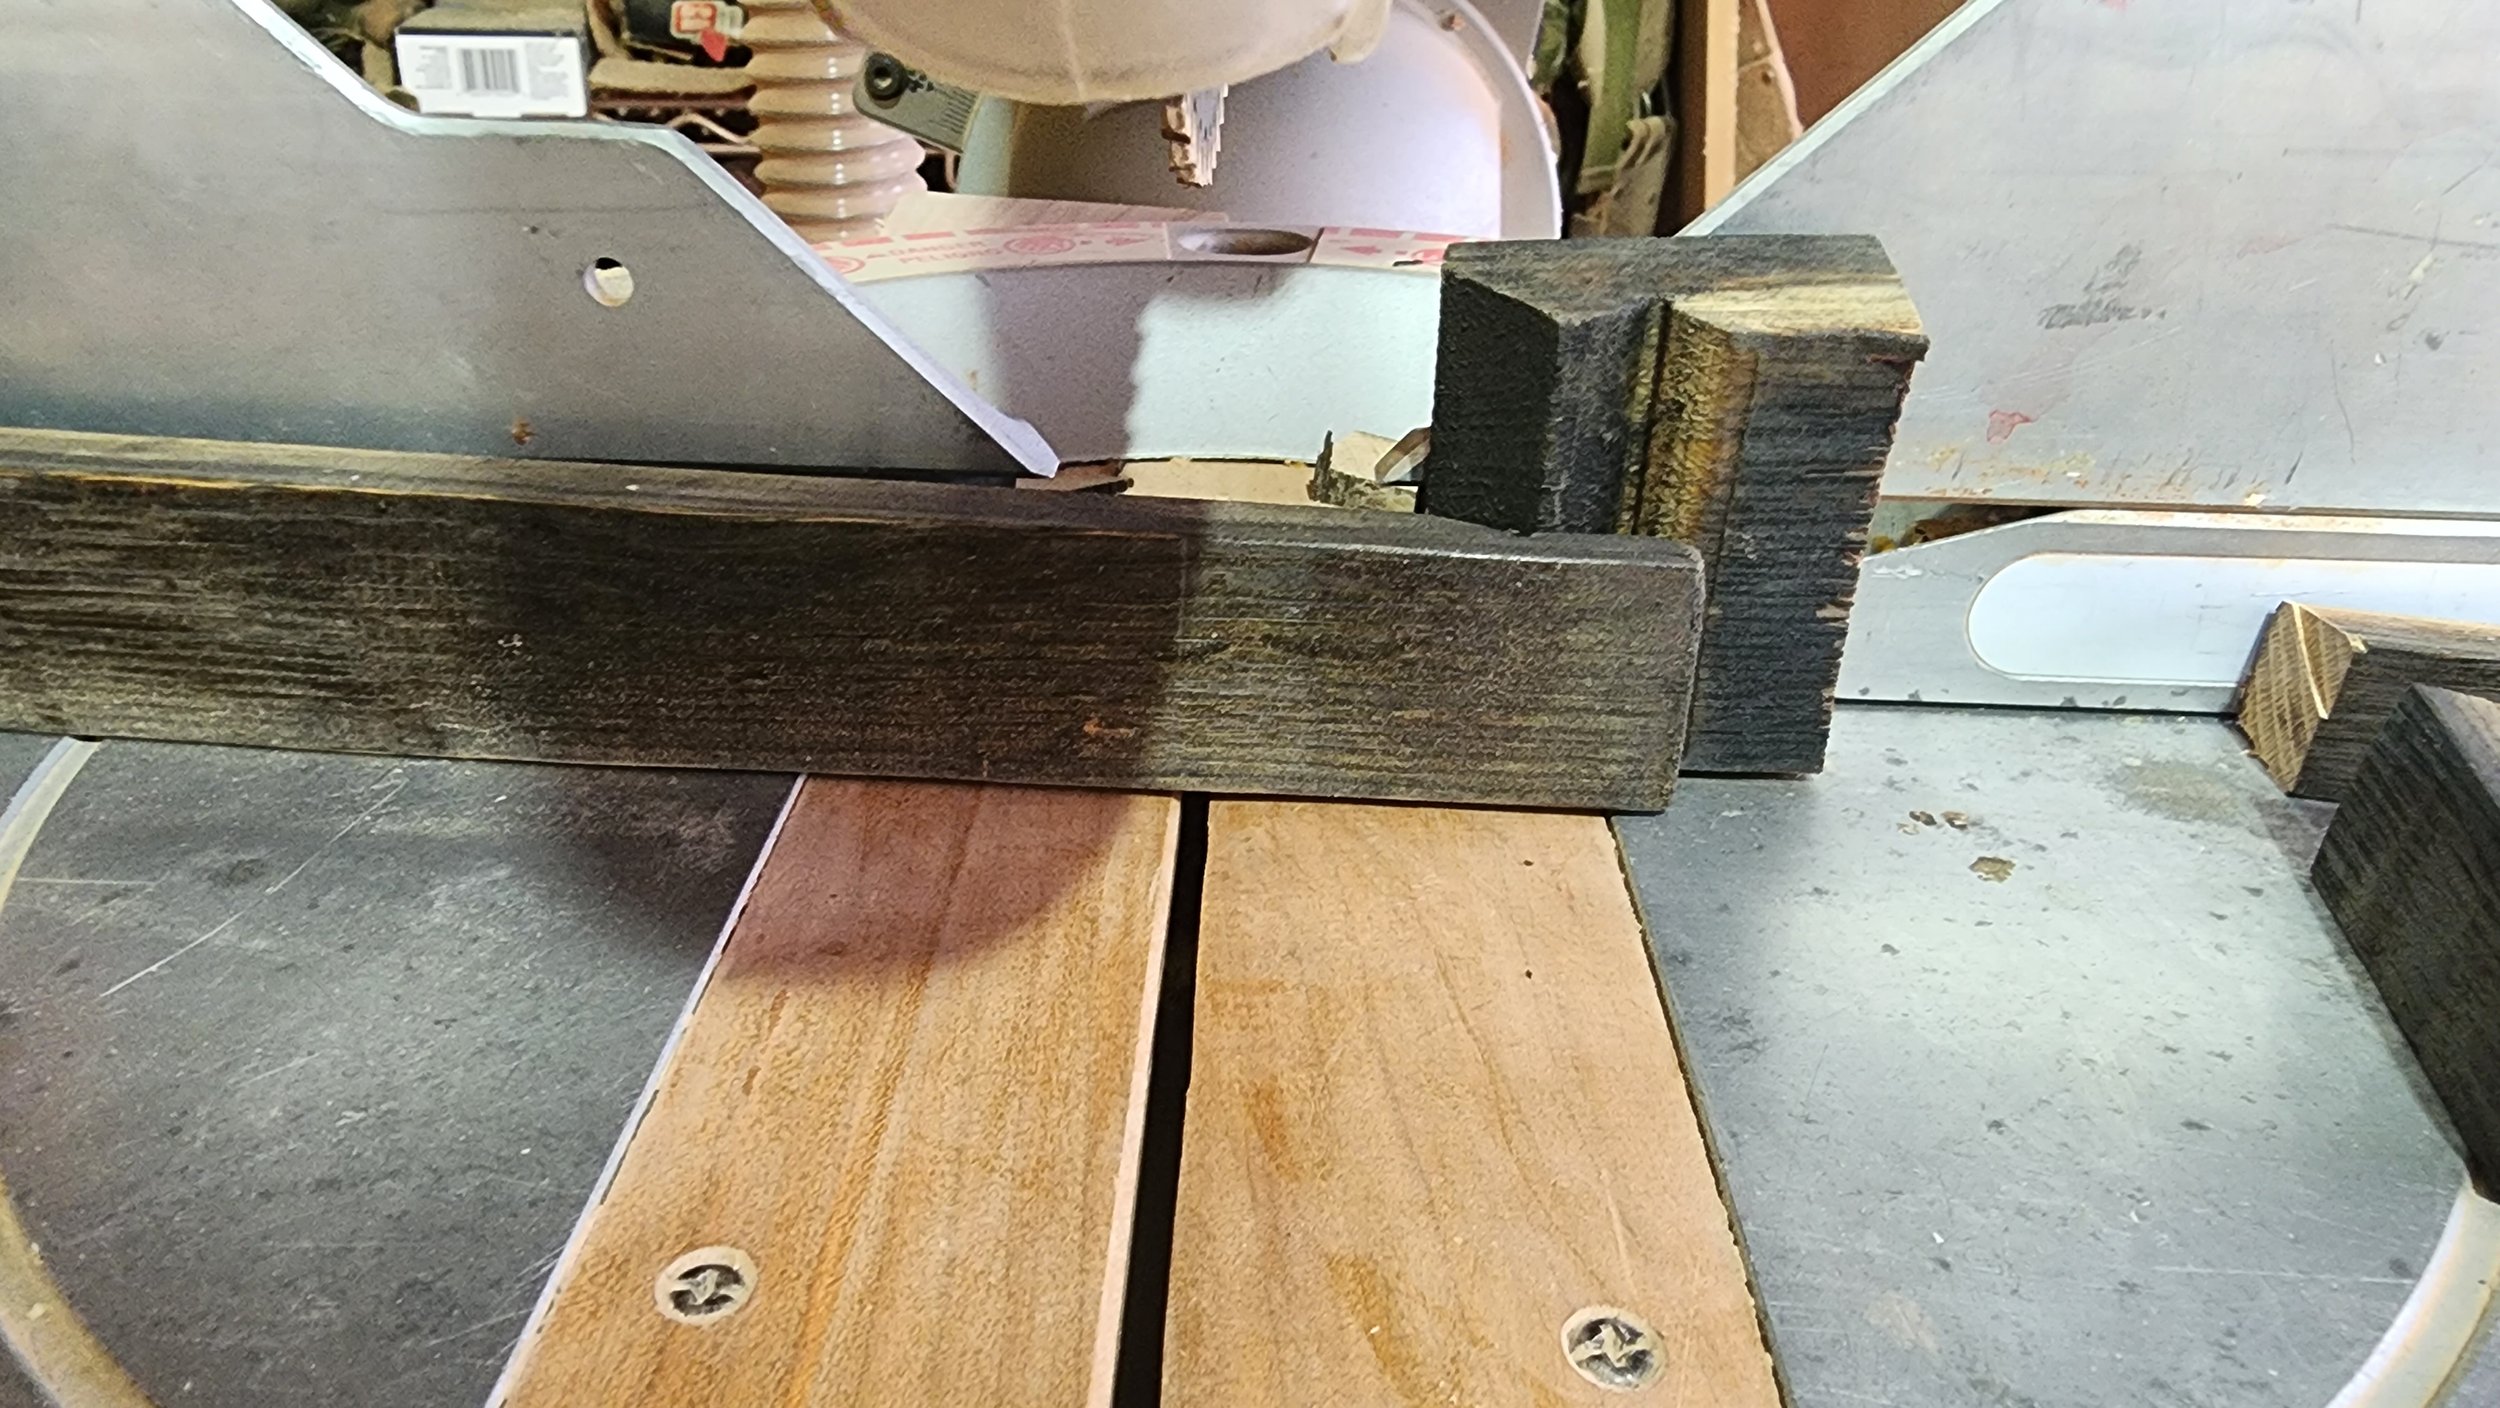

Cut the back legs to 33 inches, these should be wide but not wider than the runners. The cut end will go toward the front of the seat and will be hidden by the front legs. Again, cut them using the trick above I showed you with the seat slats.

Things will get frustrating here. You are mounting rounded wooden pieces to rounded wooden pieces and trying to make and keep them all square. Yeah, good times! I squared the seat ends to the best of my ability holding the framing square along the front of my work table and keeping the front of the lead piece against it.

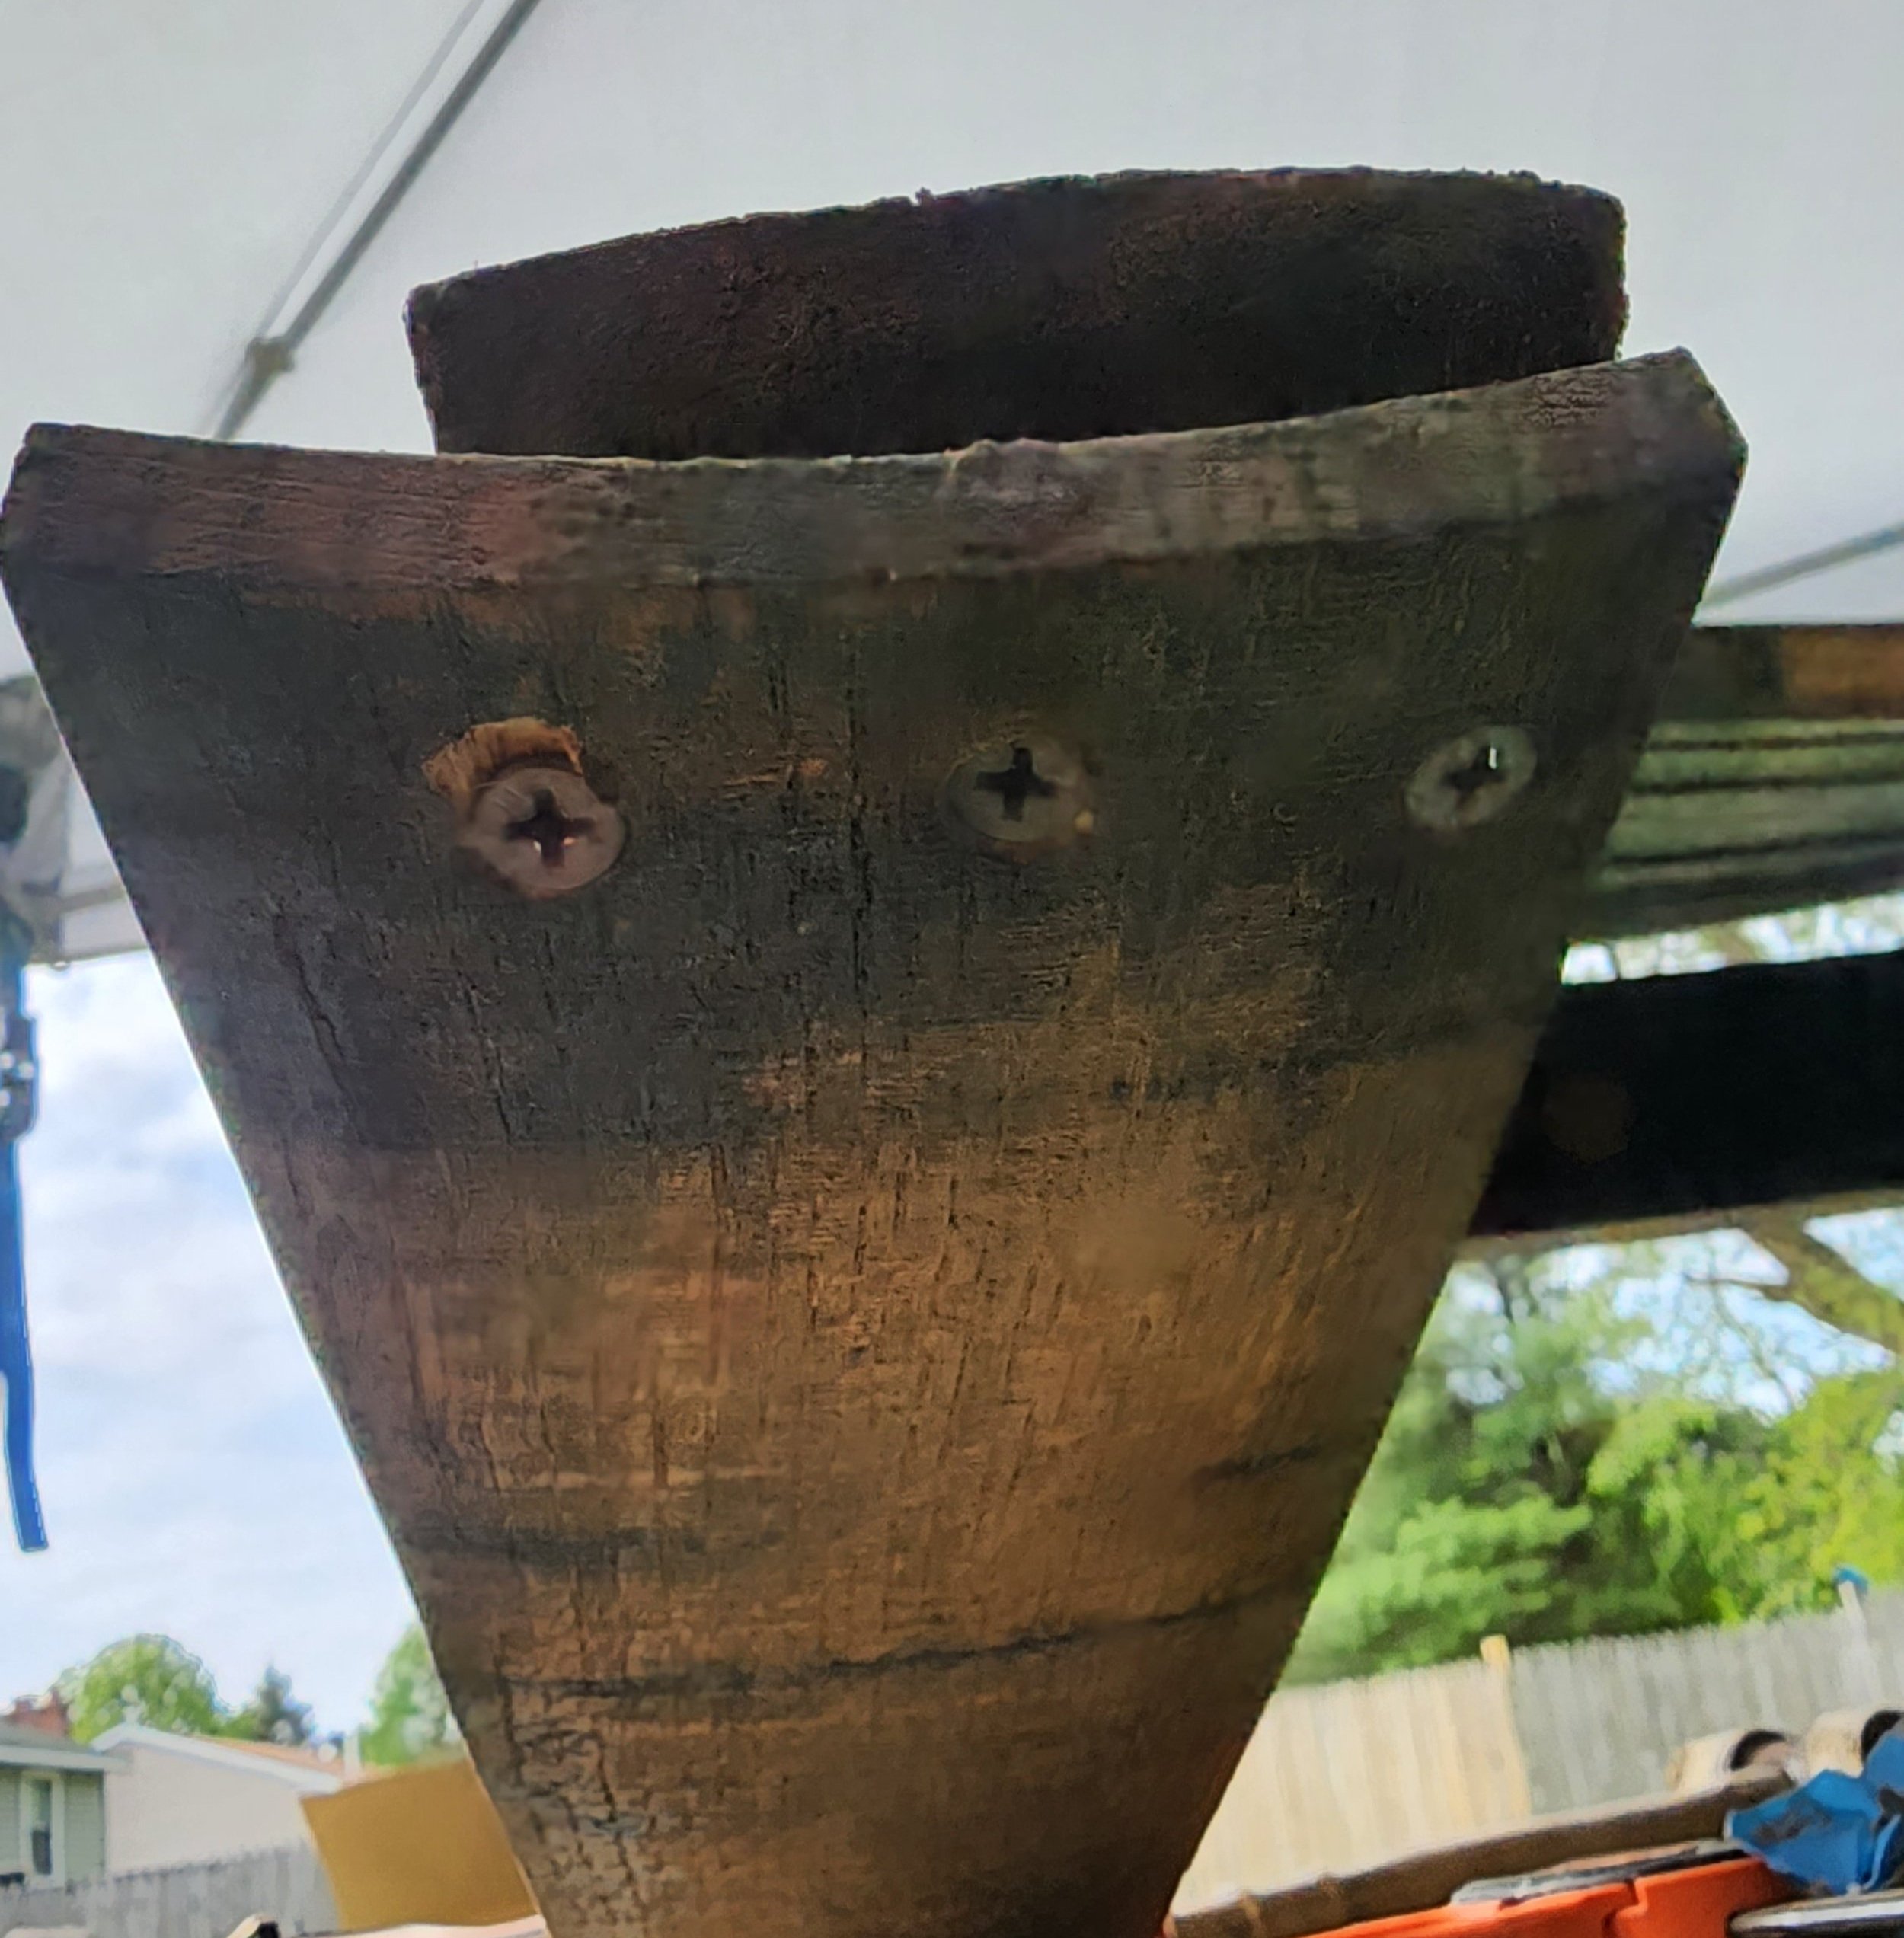
As you can see, the bottoms of these are not flush in spite of my best efforts. (oh well)
From there, clamp the back legs and measure the insides of the legs both front and back. With each chair, because the width of each stave is usually different, the number is different. In this case it was 23 inches. Remember, you’ve cut a few inches off the end of the back leg, so the measurement from the uncut end needs to be a few inches up from the end. Will it be perfect? NOPE! But it will be as close to square as you can get and that’s what matters.

Clamps and predrilled holes are your friend here!

Secure the front slat with one screw on either side, then do the same for the back. This gives you a chance to double check everything before you drilling out and screwing in the rest. Keep in mind, this is quartersawn white oak, it’s dense and will split easily if you don’t predrill everything. That, and be prepared to break a drill bit or two along the way. Whiskey (to include Irish, bourbon, Scotch, rye and the rest) is aged for years, there’s a reason they use this wood to do it! Two screws per side per slat will keep them in place, make sure to use galvanized screws as well, you’ll want them to last as long as the lumber does! Once your seat is built, you’re ready to start making the chair look like a chair. Cut the two front legs at 23 inches as shown below.

Pick boards with a healthy curve for the back legs too. The front legs and arms can have less of a curve.
Next, cut the bung hole on either end to 28 inches to match the seat insuring that the hole is centered between the legs. Measure the front legs 13 inches up and mount the bung hole stave from behind with four screws on each side. Measure two inches from the front of each runner, and drill out a countersunk hole on the outside of where each leg will sit. Predrill the hole into the front leg and mount one screw into the outside part of each leg. Sorry for the lack of pictures here, but I was busy holding this together. You’ll add another screw later, but only after you get the back legs resting on the runner and the front portion onto the bung hole stave. There’s a lot going on here so take your time.


You can see even more movement in the seat slats here.
The ends of the barrel have a notch where the barrel heads were held. Use this notch for your back leg to rest on the runner, this will take the pressure off the screws you put in as they’ll only keep the wood in place rather than support the entire piece and the person sitting in it.

Make sure to check the angle as you drill so your screw doesn’t miss the back leg or blow out the top.
With the back legs secured in place, countersink two holes through the front legs, and predrill two holes to secure the front legs to the back legs. Now, you can also drill out two more holes through the runner to the front legs. This will secure the base of the seat, which now allows you to work on the backrest. Clamp an uncut stave to the back legs behind the seat, use a couple pieces on the ends to make sure they’re far back enough to fit the entire backrest. Measure and mark the center of this board between the inside of the legs. Measure and mark a second, choose a thin one for this, to go at the top to hold the backrest together. Find a wide stave to use as the center measure and mark the center of that one four inches up at the top and bottom. Predrill and secure the stave with the thin piece you just measured then mount it to the bottom piece you have clamped in place.


The best thing is, you don’t even need to erase the pencil here. Who’s going to see it?
The easiest way to tell if you have the middle of the backrest square is to hold a 3 foot level against it, keeping the level in line with the pencil marks. I’ll use another stave that I’m not using for the chair to hole the backrest up as I put it together as shown below.

Just keep an eye on this, it will fall on your head if you’re not paying attention.
From here it’s all about symmetry. Like I said before, rarely are staves the same width or have the same curve, so put them together as best you can be based on the width. A quarter inch here and there won’t be much of an issue visually, so don’t obsess over it. I line the next stave up at the top, clamp it in place, then secure it with screws on the top and bottom doubling up screws on each piece whenever possible.

Space the staves close at the top and evenly space them as best you can along the bottom. If you have a few really thin pieces laying around, mix them in between the thicker ones for a bit of visual contrast.

None of these are the same size, but they compliment each other enough that you don’t really notice it.
With the back complete, rest the two staves you’ve selected to use as the arms on top of the front legs and clamp another stave across the back approximately 12 ¼ inches up from the bottom stave. Keep in mind, these are all different widths, so it may only be 12 depending on the size of the stave you have at the bottom of your backrest. Here I used a framing square to determine the angle of the backrest using the longest part of the square for the vertical part of the seat. This way it touched the backrest at the bottom and top of the square, giving it a comfortable angle to work from. I also countersunk the holes in the front of the arms, letting the arm extend 4 to 4 1/2 inches beyond the front leg as you can see in the completed pictures.

With the screws in place it’s time to get rid of the excess. I use a pull saw to cut the staves flush and in line with the barrel piece it’s joined to as shown below. You can also choose to counter sink and plug these screws as I did with the ones in the front. I didn’t in the case of this chair as they are far less noticeable than the ones in the front.

The cut ends of the seat slats, and backrest supports were then sanded again as well as the tops of the front legs if they stuck out beyond the arms. After, another coat of spar urethane was added. For the plugs on the front, I deliberately cut the plugs short to make sure the outside part of the plug was visible rather than the fresh white oak underneath. I felt it would blend better that way, I also tried to use dark plugs if I was placing them in a dark piece so they would blend better too. Good luck!
The 4 S’s of How to Choose a Cutting Board
The Four S’s for Choosing a Cutting Board!
Style, Size, Storage and Spend
Style, Size, Storage & Spend
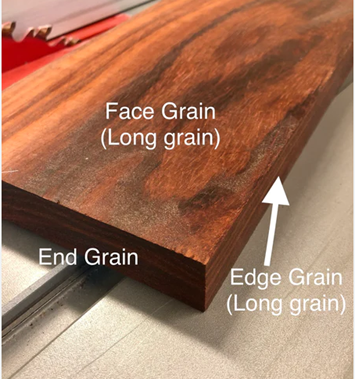
Style: End Grain, Edge Grain, or Face Grain?
Regardless of how it’s cut from a log, wood has three sides as pictured below.

Face Grain is typically used for serving trays, Charcuterie boards and table or countertops. While a face grain board can be used for cutting boards, it’s generally a harder type of wood as the grain can reflect damage easily. Charcuterie boards and serving trays are more ideally suited with a duller cheese knife rather than a paring knife.
End Grain require more wood and time to create, and are therefore more expensive, but there are considerable advantages to having an end grain board. Because the grain is facing upward and is the cutting surface, knives end to slide between the wood fibers which has two benefits. First, your knife stays sharper longer because it’s not cutting across the grain. Secondly, the fibers of the grain tend to move back together once the knife passes. The board will show far fewer cut marks than your standard edge grain board, although there are still disadvantages to end grain boards. End grain boards require more maintenance because the wood grain is exposed along the surface of the cutting board. Wood tends to absorb more, or lose moisture more, through the grain end. Based on your climate, dryer air can cause a board to dry out more, but a properly oiled board can last for years!
Edge Grain, sometimes called long grain, are made by cutting and gluing long strips of wood sideways to create a cutting board. Usually, edge grain boards use a variety of woods to create something visually appealing as well. A finished edge grain board is typically half of the steps required to make an end grain board.

Size and storage! Your kitchen isn’t going to get bigger on its own, so purchasing a board that fits your space and the size of the food you’re preparing on it, is something you need to keep in mind. The board below is 21 by 16 inches and 2 inches thick; it’s going to take up a lot of space in a cabinet or have residency on your kitchen counter! I’d prefer you show it off on your counter personally.

21x16x2 inch “Beast” board!
The proud owner of this board commissioned it because he was smoking an entire pig and needed a cutting surface big enough to handle the task. He knew he was going to have it on his kitchen counter instead of inside a cabinet, which is also why I started to offer cutting board stands. If you’re making smaller meals (less than 3 people), and certainly not carving up an entire pig, a 10 to 16 inch cutting board would certainly fit your needs better. For meal preparation for 4 or more people, a 16 to 23 inch board would be better suited for you.
But before buying a board, consider where you’ll be keeping it. An end grain board is at a minimum 1 ½ inches thick when completed, having a dedicated counter space for it may make more sense. Measure the space you have available to store a cutting board and purchase the board that not only fits your needs but your space the best. Some people hate having “clutter” on their counter tops, others find that having a cutting board handy makes life easier. Plus, having a stand to display your board serves a secondary purpose, boards should be washed in lukewarm water, but placing it on a stand afterward will help it dry completely.
Spend! Custom made wooden cutting boards are typically more expensive than plastic, bamboo, and certainly mass-produced ones. Bamboo is an incredibly hard wood, which will dull your knives quickly, and not only do plastic boards get beaten up quickly but all those grooves can hold left over food particles which will lead to bacteria. An improperly cleaned board can and will make you sick!
Thanks for reading!
Joe

It’s ALIVE!
It’s alive! KiltedMoose.com is actually up and running, and available for public view!
I can’t say if I’m nervous, excited, anxious or all of the above quite yet. Maybe it’ll hit me later on, but the reality hasn’t sunk yet. I’ve been on Instagram a while and am envious of the makers and content creators who seemingly have endless amounts of time to be talented, funny and build awesome stuff. They all started somewhere, and for me the somewhere is right here today.
Thankfully squarespace gave me two weeks to figure out how to build a website. Well, two weeks, a template, suggestions, online classes and videos and a daily reminder of how much time I had left to jump off the cliff to domain ownership. Who knew kiltedmoose.com wouldn’t be taken by some other nefarious individual? There are at least two other Kilted Moose businesses out there, one is closed and the other sells T-shirts in Canada. I don’t think we’ll get mixed up any time soon, although I did order myself a T-shirt of my own.
Now I can hopefully generate some sales to cover the monthly costs. In any case, I’ve figured out it’s less costly and time consuming than Etsy or other point of sale websites that want to take a portion of your sale as well as charge you for advertising. The competition is considerable and I feel I’ll be lost in a sea of wood workers who are doing this full time. I definitely envy those that can do this full time, with some determination and support I hope to get there in another 2 years when I retire from the Military. Might as well start planning for it now! Thanks for reading!
Joe
Builder of Cool Stuff
Domain Owner! :D

Blog Post - It Starts
It all begins with an idea.
Would you buy a chair from this guy? Boy I hope so! At almost 56 years of age, I’m writing my first blog. How good it will be remains to be seen. The actual question is, how am I going about turning my hobby into a business? The current answer; I’m working on it!
In just under two years time, I’ll retire from my life. It’s not that dramatic but it still feels that dramatic. I’ve been in the Military since Ronald Reagan was President, but only been doing it full time since George W. Bush’s administration. It’s a scary thought trying to figure out what I’ll be doing when the alarm clock goes off the morning after I retire. Oh, apparently I’m not supposed to use “retire” as it makes me sound old, so it’s “now that I’ve completed my Military service.”
The good news, I’ve found a passion and enjoyment with woodworking. I’m enjoying looking at something and trying to figure out how to make it with my own twist! Sometimes I use plans, but what I like more is building something on the fly. It’s tough to concentrate or be distracted with other things when you’re trying to figure out how to bring something into a functional piece. Wish me luck!